Hyperstack Fiji plugins
The following plugins are listed under the menu ACQUIFER > Batch > Hyperstack (or ACQUIFER > Legacy > Batch > Hyperstack for IM03 datasets) :
- Make hyperstacks
- Batch process hyperstack (macro)
- Batch process hyperstack (script)
To process individual image files in batch without generating a hyperstack, have a look at the dedicated “Batch-file” plugins.
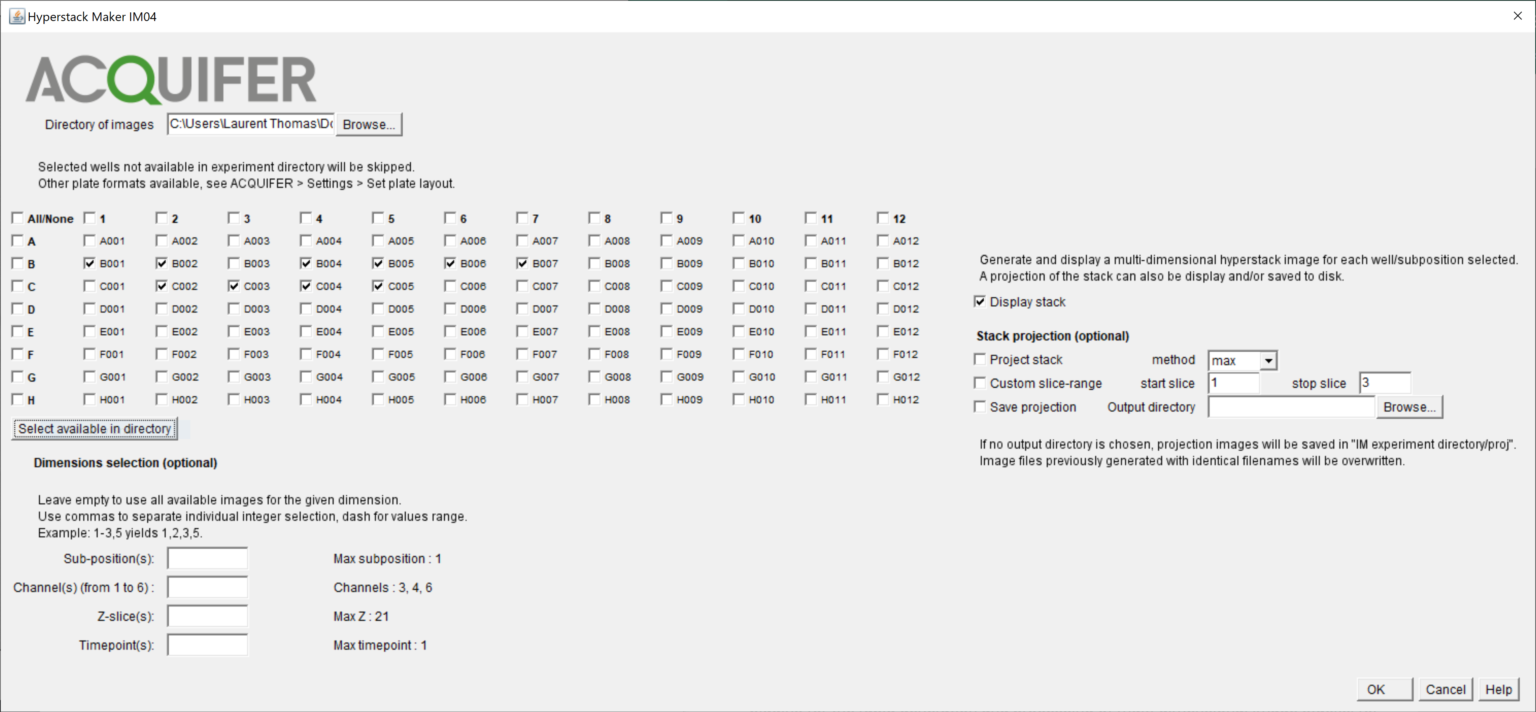
The Make hyperstacks plugin allows the generation of multi-dimensional hyperstacks (time, channel and Z-slice slider) and/or Z-projections, for specific wells and sub-positions from an IM experiment directory.
Similarly, the Batch process hyperstack plugins provide a simple solution to execute a custom macro-code or script, for every generated hyperstacks or projection images.
All plugins are macro-recordable, to facilitate their integration in custom workflows.
The plugins rely on functionalities provided by our custom acquifer-core and acquifer-IJ java packages. Advanced users can take advantage of these packages in Fiji, to write custom scripts (see scripting examples).
Like with other Batch plugins, the left part of the plugins interface let you select the wells and sub-positions for which a hyperstack or projection image should be generated.
If multiple sub-positions were imaged within a given well, the plugins generate a separate hyperstack (and/or projection image) for each sub-position, ex: B006_1, B006_2 for the 2 first positions within the well B006.
Using specific values or range for the Z-slices, channel and timepoints fields, you can restrict the content of the hyperstack/projection image to a fraction of the available images (e.g to visualize only the fluorescent channels, see Dimensions selection).
If these fields are left empty, the resulting hyperstack will contain all available images for this well/subposition.
In addition to the hyperstack, the plugins provide options to generate a projection image, using one of ImageJ projection methods.
Projections will be calculated if “Project stack”, “Show Projection” or “Save Projection” is ticked.
Don’t forget to tick the “Show projection” button to view the results of the projection. Leaving this box unticked can be used e.g. when the projection should only be saved (tick “Save Projection” exclusively), or for headless execution with the Batch process hyperstack (script) (tick “Project stack” exclusively).
However, displaying the hyperstack is not necessary to perform a projection, only the projection can be displayed.
When projecting hyperstacks with time and/or channel dimensions, the projection is performed separately for each timepoint and/or channel. The result of the projection is thus a new hyperstack, without the Z-dimension.
– Projected dimension
The content of the projected image depends on the original hyperstack dimensions.
If the generated hyperstack contains a Z-dimension, then this dimension will be projected.
If the hyperstack contains additional dimensions, then a Z-projection is performed separately for each timepoint and channel. The result of this projection is thus another stack, without the Z-dimension.
If the hyperstack does not contain a Z-dimension, then the time dimension is projected, separately for each channel.
Finally if the stack only contains a channel dimension, then this channel dimension is projected.
– Custom slice range
Only a fraction of the available slices can be used for the projection (Custom slice-range).
This can yield better results when the first and last slices of the original hyperstack tend to be out of focus. It also speeds up the computation of the projection.
The start/stop slices indicated in the GUI correspond to the slice indexes in the generated hyperstack, not the experimental slice index (SLxxx in the filename).
For instance, if the dimension selection was set to use Z-slices ranging from “experimental” indexes 10 to 15, and the projection was set to use a custom range start=1 and stop=3, the projection will be performed with slices of “experimental” Z-indexes 10 to 12 (i.e. the 3 first Z-slices of the generated stack).
– Saving projections to disk
Besides displaying the projections, the resulting images can be automatically saved to a custom directory on disk.
This directory is automatically created by the plugin if not existing.
If “Save projection” is selected and no directory is provided, images will be saved to a default sub-directory proj in the IM experiment directory.
You can customize the default settings used by the plugins to display the images, such as :
- the LUT-colors associated to the microscope channels (ACQUIFER > Settings > Set channels colors)
- the display saturation and the image-window size (ACQUIFER > Settings > Image display)
Note: the display saturation does not change the pixel values, only the display range, as in Image > Adjust > Brightness/Contrast.
Using this plugins, custom macro-commands can be executed systematically for each generated hyperstack or projection, hence providing built-in batch processing functionality.
See our example macros on GitHub or in Fiji under the menu Acquifer > Examples > Batch hyperstack > macro.
In ImageJ/Fiji, executing macro-commands requires displaying the images (tick Display hyperstack and/or Display Projection).
However, you can turn on headless mode after that in your custom macro.
– Duplicate virtual stacks
A number of macro-commands do not work on virtual stacks (what we use to avoid saturating the computer memory). The macro should thus first duplicate the generated hyperstack before executing some commands. See this first example macro demonstrating how to duplicate the active image, process it and save it to the default directory as defined in the plugin interface.
– Process the active image or select the image to process
Macro-commands are always executed on the currently active image. If both the hyperstack and projection are displayed, by default the macro-commands will be executed on the last generated image i.e on the projection.
To avoid that, set the active image to either the stack or the projection image using selectImage(yourImageName) before executing some commands.
You can recover the name of the stack and projection images generated by the plugin at each iteration using getArgument() followed by Ext.splitArguments as demonstrated in this template macro.
– Default directory, image directory and image name
To facilitate saving images in the custom macro-code, the GUI provides a field for a default directory.
If left empty, the default directory will point to : YourExperimentDirectory/macro_output.
The plugins automatically create this default directory on disk if not existing, and store the path to this directory in a string variable accessible in the macro-language using the command getDirectory(“default”).
Similarly you can recover the directory of the active image with getDirectory(“image”). This can be used to recover the current dataset directory.
However, make sure to call this command before generating new images within your macro, as the command would otherwise return the directory for this new image (which might be None if they are not yet saved).
Finally to recover the current image name, use the command getTitle(). The title is the name of the image window, not the filename (there is no filename for hyperstacks, since it is a collection of files not a single file).
The custom script execution offers more flexibility than the macro execution.
Script files of any programming language supported by Fiji can be used, see the examples for the macro language and for jython on GitHub.
The only condition is that scripts should start with a fixed input convention, with 2 script parameters as following:
#@ImagePlus stack
#@ImagePlus proj
# The rest of your code (jython, groovy, ImageJ macro...)
Displaying the images is in this case optional, the ImagePlus objects in memory for the hyperstack (stack) and projection (proj) are directly passed to the script.
This does not apply for ImageJ macro files, for which images will be automatically displayed. In this case the stack and proj variable will resolve to the windows title, such that you can use the commands selectImage(stack) and selectImage(proj).
Note: If no projection was generated, the proj variable will be null.