Fiji plugins for batch-processing
The ACQUIFER update site in Fiji (available upon request) provides a set of “Batch” plugins (menu ACQUIFER > Batch) to facilitate the visualization and processing of large image-datasets acquired with the Imaging Machine.
The batch plugins cover various functionality including data-conversion, selective data-copy, execution of custom macros and scripts.
We distinguish 2 categories of batch-plugins :
– the “Batch-files” plugins which directly operate on individual image-files
– the Hyperstack plugins for the generation and optional processing of multi-dimensional images for each well/sub-position.
See the tutorial on youtube…
Batch plugins interface
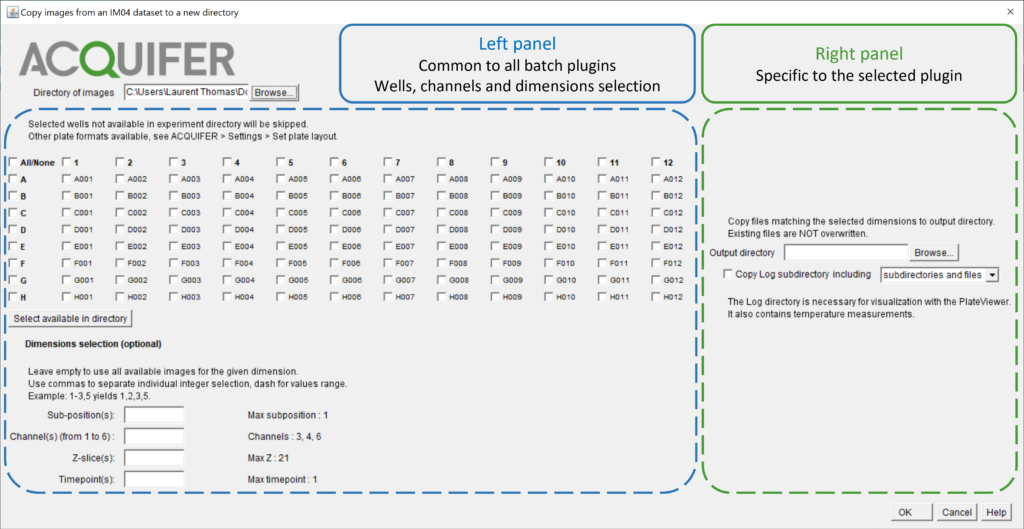
All batch plugins share a similar user-interface (see below), with a constant left panel for the selection of specific wells, sub-positions within wells and other dimensions to include for processing.
The right panel of the interface is specific to each plugin, and contains the settings of the custom commands executed for each image file/hyperstack image.
All plugins are macro-recordable to facilitate their integration in custom image-processing workflows. They internally rely on our custom ACQUIFER java packages, which you can also use for scripting in Fiji (see examples).
Experiment directory
The first parameters of the plugins is the path to a directory of IM images.
This directory should contain the list of images as separate files, following the original filename convention for IM images.
For instance:
-A001–PO01–LO001–CO6–SL001–PX32500–PW0080–IN0020–TM281–X014580–Y011262–Z210710–T0200257564–WE00001.tif
Plate formats
The plugins support classical well plate formats (6, 12, 24, 48, 96, 384) which can be set in ACQUIFER > Settings > Set plate layout.
The layout will be applied to all the “Batch” plugins.
Wells selection
The batch plugins provide a convenient solution to selectively process all or a subset of an Imaging Machine dataset.
The central checkbox-grid let you easily select the well to process. By default, all sub-positions within a selected well will be processed, if no particular sub-position(s) are specified (see Dimension selection below).
You can also click the button Select available in directory, to automatically select wells present in the directory currently set in the field “Directory of images”.
Selecting wells which are not actually present in a dataset has no effect, these wells are simply skipped. This can be useful when using macro-recording to execute the plugins successively on multiple experiment datasets, each with different set of wells.
Dimensions selection
The plugins let you specify which sub-positions, channels, Z-slices or timepoints should be processed.
By default the dimensions fields are empty resulting in all images being used.
Use numbers separated by commas to select specific values, e.g. use 1,3,5 in the Z-slice field will result in processing only the first, third and fifth Z-slices of each selected well.
For range of values, specify the first and last index to include, separated by a dash, e.g. 1-10 in the timepoint field to include the first 10 timepoints.
Using values out of the available range will trigger an error, for instance the channels indexes is limited to values between 1 and 6 (Brightfield), while Z-slice and timepoints cannot be smaller than 1.
Experiment directory